A rollout looks simple until your hips drop, your lower back takes over, and the wheel suddenly feels like it has a mind of its own. Learning how to use ab wheel correctly is less about rolling far and more about keeping your whole body connected while resisting the pull toward the floor. Start smaller than you think, and the exercise can become one of the most effective compact core tools in a home gym.
What an Ab Wheel Actually Trains
Rollouts are commonly used to train core stability. In plain language, your core works to stop your lower back from arching as your arms move forward. Your rectus abdominis, deep core muscles, obliques, shoulders, lats, chest, hip flexors, and glutes all contribute.
That full-body demand is why an ab wheel rollout can be more challenging than many floor ab exercises. It is also why range of motion matters more than repetition count. A controlled short rollout with a neutral spine is productive. A long rollout that ends with a sagging lower back is usually just an uncomfortable way to practice poor positioning.
For home exercisers, the wheel earns its place because it is small, affordable, and easy to store. But it is not automatically beginner-friendly. Your starting variation should match your current core and shoulder control, not your motivation level.
How to Use an Ab Wheel With Proper Form
Set the wheel on a flat, non-slip surface. A low-pile rug, exercise mat with good grip, or hard floor works well. Thick, soft carpeting can make the wheel track unevenly. If you are kneeling, place a folded mat, knee pad, or towel beneath your knees for comfort.
Set up your starting position
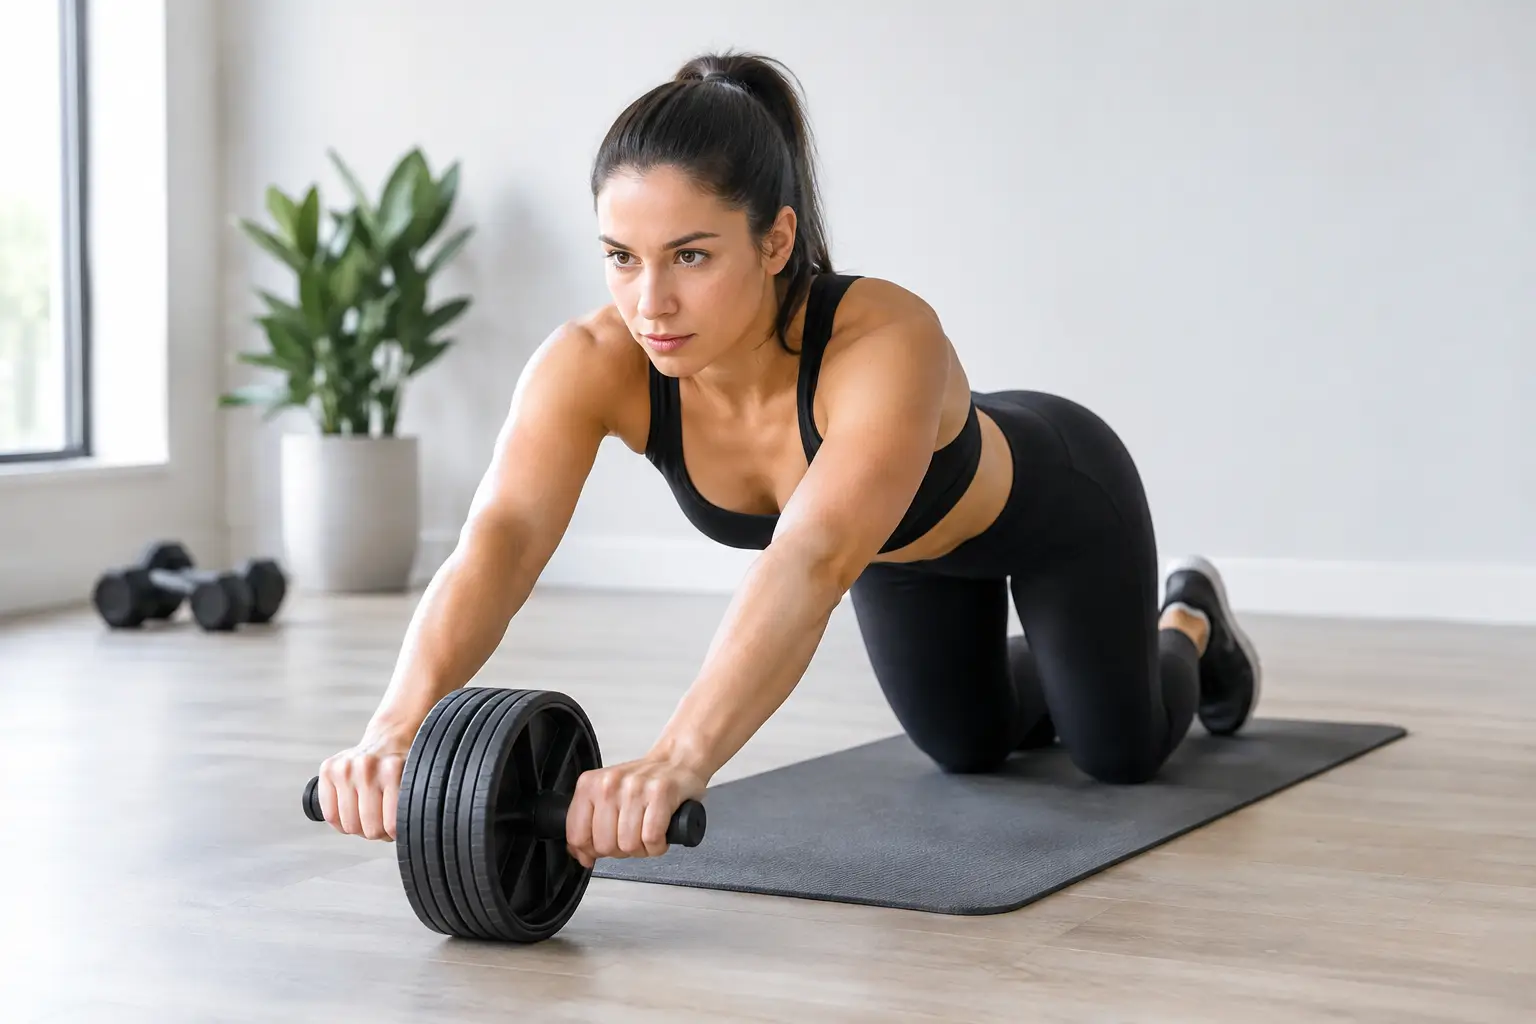
Kneel behind the wheel with both hands on the handles and your shoulders stacked roughly over the wheel. Keep your arms straight but not forcefully locked. Before you roll, squeeze your glutes gently, pull your ribs down, and brace your midsection as if preparing for a light punch.
Your body should feel like one connected line from shoulders through hips to knees. Do not begin with your hips sitting back toward your heels, and do not start with an exaggerated arch in your lower back. Looking down slightly at the wheel helps keep your neck in a comfortable, neutral position.
Roll forward slowly
Move the wheel forward by allowing your shoulders and arms to travel together. Keep pressure through both handles so the wheel does not veer to one side. Your hips will move forward and lower slightly, but they should not collapse toward the floor.
Only roll as far as you can maintain three things: braced abs, active glutes, and ribs that are not flaring upward. For many first-time users, that may be only a few inches. That is enough. The right range is the one you can control without feeling your low back take over.
Pull yourself back with your core
To return, press your hands into the handles, tighten your abs, and draw your ribs and hips back together. Think about pulling the wheel toward you with your lats and abdominal muscles rather than yanking it back with your arms.
Finish in the same stacked kneeling position where you started. Reset your brace before the next repetition. Fast repetitions usually hide a loss of control, so use a slow pace in both directions.
The Form Checks That Protect Your Lower Back
The ab wheel does not have to hurt your back, but it will quickly expose a weak or tired brace. A little muscle effort through the abs, shoulders, and lats is expected. Sharp pain, pinching, or increasing low-back discomfort is a signal to stop and reduce the range.
The most common issue is lumbar extension, where the lower back arches as the wheel rolls away. Correct it by shortening the rollout, squeezing your glutes harder, and thinking "ribs down." If that cue does not help, switch to an easier variation rather than pushing through.
Another common issue is bending at the hips while keeping the chest high. This turns the movement into more of a hip hinge and reduces the core challenge. Keep your hips traveling with your shoulders instead of leaving them behind.
Finally, avoid shrugging your shoulders toward your ears. Keep your shoulder blades active and your arms reaching forward, but maintain space between your shoulders and ears. This makes the rollout feel more stable and friendlier on the neck.
Start With the Right Ab Wheel Progression
A full kneeling rollout is not the only way to train with an ab wheel. Using a progression lets you build confidence without buying extra equipment or forcing a range you do not own yet.
Wall rollouts
Face a wall while kneeling, with the wheel a short distance in front of you. Roll forward until the wheel touches the wall, then return. The wall limits your range and makes every rep repeatable. As you get stronger, move your knees farther from the wall.
Incline rollouts
Place the wheel on a stable raised surface, such as a solid bench or countertop that will not slide. The higher the surface, the less body weight you need to manage. This is a useful option if kneeling rollouts feel too demanding or if you are returning to training after time away.
Partial kneeling rollouts
On the floor, use a deliberate short range. Put down a small object in front of the wheel as a depth marker, then stop before your form changes. Add distance gradually over several workouts rather than testing your maximum reach every session.
Full kneeling rollouts
When you can perform controlled partial reps without back discomfort, increase your range toward a longer kneeling rollout. Keep the same slow tempo. A full range is not defined by how close your chest gets to the floor. It is defined by how far you can roll while keeping control.
Standing rollouts
Standing rollouts are an advanced variation. They place much more load on the core, shoulders, and hips, and they demand a strong hinge position and excellent bracing. Most home exercisers do not need them to build a capable core. Treat them as an optional long-term goal, not a required next step.
A Simple Ab Wheel Workout Plan
Two or three sessions per week is plenty for most people. Your abs, shoulders, and hip flexors need time to recover, especially while you are learning the movement.
Start with 2 to 3 sets of 5 to 8 controlled wall, incline, or partial kneeling rollouts. Rest 60 to 90 seconds between sets. End each set when you notice your hips dropping, your back arching, or your return becoming jerky. Leaving one or two clean reps in reserve is a smart trade for better technique next session.
After you can complete 3 sets of 8 with steady form, increase the distance slightly or add one or two reps per set. Do not increase both range and volume at once. Progress is easier to track when you change one variable at a time.
Pairing rollouts with exercises such as dead bugs, side planks, glute bridges, or carries can create a balanced core session. These movements train bracing from different angles, which can make your rollout position easier to hold.
Choosing an Ab Wheel for a Home Gym
Most basic ab wheels work, but a few design details affect comfort and control.A wider wheel is often described as easier to control for beginners, while many users find a narrow wheel less forgiving side to side. Textured handles improve grip, especially when hands get sweaty, and padded handles may be more comfortable during longer sets.
Some models include a spring-assisted return feature. This can make the return portion easier, but it also changes the feel of the movement and may mask weaknesses in control. It can be a good choice for a beginner who needs confidence with the motion, but a standard wide wheel is often all most home gyms need.
Check the wheel's stated weight capacity and make sure the handles feel secure without wobble. You do not need an oversized accessory collection to use one well. A stable wheel, a supportive knee pad, and enough clear floor space for your planned range are the essentials.
When to Skip the Ab Wheel
If you have an acute shoulder, wrist, or low-back injury, get guidance from a qualified healthcare professional before adding rollouts. The same applies if you feel numbness, radiating pain, or pain that persists after training. An ab wheel is a training tool, not a test of toughness.
If kneeling bothers your knees, add more padding or use an incline setup. If wrist extension is uncomfortable, handles with a more ergonomic grip may help, though a different core exercise may be the better choice. The best home-gym equipment is the equipment you can use consistently and comfortably.
Your first ab wheel goal does not need to be a dramatic floor-level rollout. Make it five slow, controlled reps that leave your abs working and your back feeling normal. Build from there, and this small piece of gear can deliver far more value than its footprint suggests.
General information only: this guide is not medical advice. If you are new to exercise or managing a health condition, get qualified advice before starting a new routine, and stop on sharp pain, dizziness, or unusual discomfort.