
How to Choose a Pull-Up Bar That Is Safe for Home Use
Pull-ups are one of the most efficient upper-body exercises you can do at home, but a poorly chosen or improperly installed pull-up bar turns a productive workout into a safety risk. Choosing the right bar means matching the product to your space, your strength, and how you’ll use it.
This guide walks through the key decisions—types, load capacity, mounting, installation, and accessories—so you can pick a pull-up bar that stays secure and lets you train with confidence.
Types of Pull-Up Bars: pros and cons
Common options for home use include doorway bars, wall-mounted bars, ceiling-mounted bars, and freestanding rigs. Doorway bars are affordable and portable but can be less stable under swinging or added weight. Wall- and ceiling-mounted bars give the best stability if you can anchor them into studs or solid joists. Freestanding rigs are versatile and require floor space, but they’re bulkier and often require a protective floor surface underneath.
If you plan to store the bar or swap accessories regularly, consider coordinating storage with dedicated solutions such as Home Gym Storage Organizers so gear stays accessible and the area remains safe.
Load capacity and material: what to check
Every pull-up bar lists a maximum load or user weight. Don’t treat this as a ceiling that applies only to your body weight—factor in dynamic loads (momentum from kipping or swinging) and any added weight like a Weighted Vests. Look for bars made from solid steel with visible welds and a clear manufacturer weight rating. A large safety margin—ideally 1.5–2x your expected peak load—is smart for longevity and safety.
Mounting methods and the surface you have
Mounting choice is driven by construction. For wall- or ceiling-mounted bars, always mount into structural members (studs or joists). Avoid mounting into drywall alone. If your house doesn’t allow secure mounts, a freestanding rack is the safer option. For freestanding setups and home gyms with children or multiple users, protect the impact area with appropriate flooring; quality surface options like Gym Flooring Tiles reduce slip and cushion minor falls.
Installation best practices
Follow manufacturer installation instructions exactly. Use the specified length and grade of fasteners, torque bolts to recommended values, and confirm the mount is level. If you’re not confident identifying studs or joists, use a stud-finder and consider hiring a qualified handyman. When testing, do incremental load checks: hang from the bar gently, then increase force before full, dynamic use.
Placing a protective surface under and around the bar prevents damage to floors and offers traction for laddering or step-up access—consider an Exercise Equipment Mat under the unit.
Grip, safety features, and accessories
Grip design matters for both comfort and injury prevention. Look for non-slip textured bars, ergonomic knurling, or removable cushioned grips. If you have weaker wrists or do weighted pull-ups, wrist support can protect joints; high-quality Wrist Wraps help stabilize the wrist and reduce strain during heavier sets.
Other useful features: multiple grip widths, integrated safety stops (on rigs), and quick-release options for removable bars. If you plan to add weight to your pull-ups, factor that into your bar and anchor choice.
Space planning and storage
Measure vertical clearance: you need headroom for full extension plus space if you use kipping or muscle-up variations. Account for swing radius and walkway clearance around the bar. If space is limited, look for fold-away or removable bars and plan storage so the unit doesn’t obstruct egress. Compact storage solutions like a dedicated Home Gym Storage Rack, Adjustable 4-tier keep your attachments, gloves, and maintenance tools organized while freeing floor space.
Surface protection and fall mitigation
Even with proper installation, falls can happen. Place a durable mat beneath the bar to absorb impact and reduce slip—options such as the SUPERJARE 1″ Extra-Thick Rubber Top Exercise Mat provide extra cushioning for freestanding rigs and landing zones. For permanent fixtures over finished floors, use protective mats or tiles to prevent gouging and to keep the area non-slip.
Maintenance and inspection routine
Establish a simple inspection routine: weekly visual checks of bolts, anchors, welds, and grips; monthly torque checks on key fasteners; and immediate repair or replacement of any cracked or deformed parts. Keep spare bolts and mounting hardware organized so replacements are available—storing small parts in labeled bins or on a nearby rack such as a Barbell Storage Racks or shelving unit prevents last-minute shortcuts that compromise safety.
Checklist: Quick safety and purchase guide
- Confirm mounting option matches your wall/ceiling structure and anchors into studs/joists.
- Choose a bar with a rated load at least 1.5–2x your expected peak load (body + dynamic forces + added weight).
- Prefer steel construction, welded joints, and positive customer reviews about durability.
- Plan floor protection under the bar (exercise mat or gym tiles) to reduce slip and cushion falls.
- Test installation gradually and re-check bolts regularly.
- Use wrist support or grip aids if doing heavy or repeated sets.
- Store extra hardware and accessories in a dedicated organizer or rack.
FAQ
-
Q: Can I install a wall-mounted bar on drywall?
A: Not safely. You need to anchor into studs or use structural backing. Drywall-only anchors are not rated for the dynamic loads of pull-ups.
-
Q: Is a doorway pull-up bar safe for weighted pull-ups?
A: Most doorway bars are designed for bodyweight only; check the manufacturer rating. For weighted work, choose a rig or mount that specifies higher dynamic load capacity.
-
Q: How often should I inspect the bar and mounts?
A: Do a quick visual check weekly, torque check monthly, and re-inspect after any hard impact or major temperature/humidity changes.
-
Q: What flooring should I use beneath a freestanding rig?
A: Thick rubber gym tiles or an extra-dense exercise mat are ideal to protect the floor and reduce impact risk—choose options rated for heavy equipment.
-
Q: Are wrist wraps necessary?
A: Not required for everyone, but wrist wraps or grip aids help maintain wrist alignment during heavy sets and may reduce strain for lifters adding external load.
Conclusion
Choosing a safe pull-up bar means matching type and mounting method to your home’s structure, confirming a strong load rating, planning for protective flooring, and committing to regular inspection. Prioritize secure anchors and protective surfaces; add appropriate accessories and storage to keep your setup safe and usable over time. A carefully chosen, well-installed bar keeps your workouts effective—and your home safe.
Products Featured in This Article
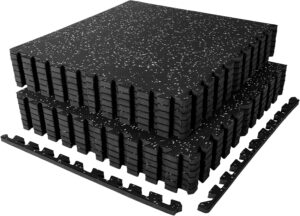
SUPERJARE 1″ Extra-Thick Rubb…
Product description 1 Non-Toxic & Safe for Use 2 Train with Superjare 【1 Inch Thicken Gym…
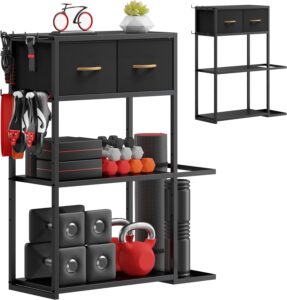
Home Gym Storage Rack, Adjustable 4…
Product description Any tips for assembling the shelves? For best results, lay the shelf completely flat…
